Create web graphics with Photoshop – The Fundamentals
Part 3 – Essential Tools

This is the third and probably the last post for the series of posts about Creating web graphics with Photoshop. Part 1 again deals with different image types supported by web browsers; part 2 focuses on saving images for the web; and this part, part 3, is about Photoshop essential tools: the Layer palette, the History palette, Crop tool, Text tool, Eyedropper tool, and Image Adjustments menu.
Why those tools but not the others?
These are the tools I use most frequently to create web graphics and update images on websites. Plus, their usage is the one I often got asked about by others.
Photoshop comes with tons of tools, menus, filters, etc., and this is what makes Photoshop Photoshop with unrivalled capabilities. However, it has become way too complicated and confusing for marketing professionals who want fast and easy way to get the job done right and quickly. Below are the essentials.
1. LAYER PALETTE: If you’re not aware of the Layer palette in Photoshop, chances are you can open a Photoshop file but can’t edit or update it because most Photoshop files contain several layers such as layers to hold text and layers to hold images. You must be on the correct layer to be able to edit certain text or image. To select a layer, click on that layer on the Layer palette. The selected layer will be highlighted.
To open the Layer palette, go to Window menu and click on Layers.
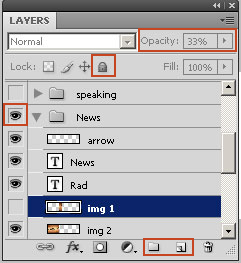
The highlighted areas on the image on the left are the basics. Starting from the bottom, the 2 folder-like icons are for creating new folder and new layer respectively. Folder is an organizing tool; you can put many [related] layers in one folder. For example, you can have a folder to hold all text layers, and another folder to hold all image layers You can also keep all artwork of banner 1 in one folder, and all artwork of banner 2 in a different folder.
Next, the eye icon is for turning a layer or a folder on or off. You can click on the eye icon to turn that layer/folder off, and click again to turn it back on. Sometimes when making an update, you don’t need to delete old artwork, you just need to hide it by toggling this icon. Hiding and showing a layer or folder is also a great way to help you decide among different variations to choose the best elements or designs.
Next, the lock icon is for locking or unlocking a folder or a layer. If a layer is locked, you can’t edit or delete it until after unlocking it. Locking is a way to protect a folder or layer from being accidentally changed or deleted. I usually lock a layer/folder when it’s final.
Last but not least is the Opacity section. Here you can change the opacity of a layer or a folder. 100% means completely opaque, and 0% means completely transparent. Lowering the opacity of a layer will make the layer become more transparent and making the layers underneath it to show through.
2. HISTORY PALETTE: Unlike MS Word or Excel, in Photoshop Undo/Ctrl Z only lets you undo or go back one step. If you want to go back several step, History palette is your friend. To open, go to Window menu and click on History. It’s always nice to know that what’s done can be undone.
Above are the two basic but really important palettes in Photoshop. Let’s move on to explore some fundamental icons on Photoshop tool bar and their applications. Photoshop tool bar are visible by default. If it’s not there, to display it you need to go to menu Window and click on Tools.
3. CROP TOOL: This tool let you crop and size / re-size the image exactly the way and size you want. Re-sizing and cropping an image to fit a banner of certain size or creating a headshot out of a full body photo should be good candidates for Crop tool. To crop an image, click on the Crop icon  on the Tool bar to activate it; press and hold the left mouse and drag the area you want to crop on the image; release the mouse and hit enter to confirm/apply. If you want to specify the size, just enter the numbers for width and height in the crop property bar, then press and hold the left mouse and drag the area you want to crop; your cropped area will be (re)sized exactly at the specified width and height. For the web, setting resolution at 72 (pixel/inch) will be good enough.

4. TEXT TOOL: This tool is for creating or editing text. To create new text, click on the Text icon  ; the regular arrow cursor will be changed to the text cursor; then click on the stage where you want to add your text. After clicking on the stage, Photoshop will automatically inserts a [new] text layer for you, and you can now type in your text. To edit text, you need to know the layer your text is currently on. Double-clicking on the [T] icon on the Layer palette will let you edit the text.
Like the Crop tool, when you select/use the Text tool, a property bar will appear. You can change the font type, font size, color, alignment… using this property bar. If you ever want to match the text color with certain color from an image, you can use the eyedropper tool.
5. EYEDROPPER TOOL: This tool is to help you select colors for fill and text. You can get HEX, RGB and CMYK values of any color from any artwork opened in Photoshop. For example, you see some interesting colors from a web page and want to know the RGB values, here’s what you can do: do a printscreen or screen grab of the web page, then paste it to Photoshop; click on the eyedropper icon on the tool bar  , your mouse cursor will turn into an eyedropper; use the eyedropper to click on the color of interest, your foreground color will be changed accordingly; double-click on the foreground color and get the HEX or RGB values.
6. IMAGE/ADJUSTMENTS: Last but not least is the Image > Adjustments menu. The menu lets you quickly change the bright/contrast, and even change the hue [the color] and saturation [the intensity of a color] of your image/artwork. Spend some time to play with it, it’ll be fun!
Well, again, hope it helps! Please provide feedback or comment in the box below. Best!
great blog thank you
it was very interesting to read.
I want to quote your post in my blog. It can?
And you et an account on Twitter?